Each year, Salesforce releases three seasonal updates that provide enhancements and key upgrades to their product offerings. Those releases take place in the Spring, Summer, and Autumn, albeit with Salesforce calling them Spring, Summer, and Winter.
At the time of writing this post, the Winter ’25 seasonal release has recently launched. The Winter ’25 release was rolled out for most Salesforce instances in early October. In this post, we are going to share a sampling of standout highlights that we think might be useful for our nonprofit customers.
Who should read: this is a Salesforce Administrator focused blog, as opposed to one focused on end-user functionality. We will endeavour to produce a follow-up blog, focusing on new end-user functionality.
But before we get to it, we thought it would be worth providing some brief instructions on how to find out when your org will be upgraded to the Winter ’25 release.
How to Find Out When Your Org Will Be Upgraded
Finding out when your org will be upgraded is simple, it just takes a few steps. You will first need to know what instance of Salesforce your org is running on. To find this, you need to go to Company Information which can be found in Setup using the Quick Find search bar. On the Company Information page, locate the Instance field, and grab the instance number (it will be something like UM8 or CS26). Once you have that, you will be ready to carry out these steps to find your release date.
- Go to https://status.salesforce.com.
- Type your instance number into the search bar on the page.
- Click the instance number when Salesforce displays the option.
- Click the Maintenance tab to view the maintenance items for your instance.
- Find the Major Release maintenance items and make a note of them.
- The Major Release items listed in the maintenance tab are the dates when your org will be upgraded to that release. For this release, you will be looking for the Winter ’25 Major Release.
Winter ’25 Release Highlights
Now that we’ve covered how you can find when your org will be upgraded, let’s get on to the highlights we think are worth noting for this release. This will not be an exhaustive list as there are other excellent articles that cover release highlights that we would encourage you to check out (links below). For now, these are the four key areas of enhancements that we think are the most helpful to know about. Let’s dive in.
Customisation Updates
The first area we want to highlight is updates in and around the area of customisation. We have three items to highlight in this area, one is a significant update in organising data in your org’s list views, the second adds the ability to conditionally display a coloured icon next to a field to depict the field’s value, and the third item highlights how you can now conditionally choose which fields appear in a record’s highlights panel.
Sort List Views by Multiple Columns (Beta)
One of the standout highlights of this release, is the ability to sort records in a List View by multiple columns. Historically, list views could only be sorted using one column. In this release, this changed with the ability to sort records in a list by up to five different columns. This can be enabled in the User Interface area inside of setup. Once enabled, you will be met by a new multi sort button, and once that is clicked, you can configure your sorting parameters.
As shown in the image below, once you have clicked on the button, you select the columns to include in the sort.
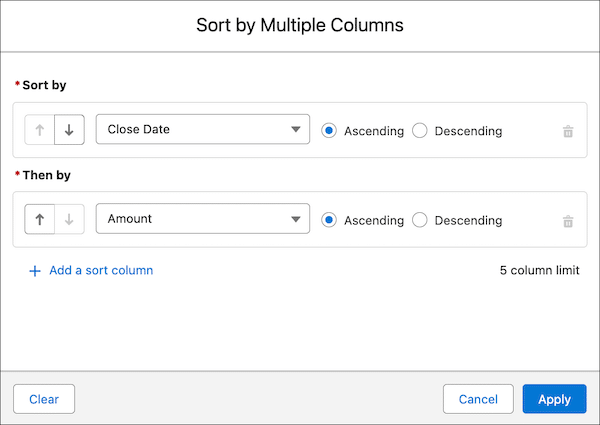
If you want to use this feature, it will be important to bear the items listed below in mind:
- Changes made to a List View apply to everyone who has access to the selected List view.
- Only fields that are visible in the List View are available to sort by.
- List Views can be sorted by up to 5 different fields.
- Sorting priority can be re-ordered, and the sort options are Ascending and Descending.
- Users with manage access to List Views will be able to edit the sort out.
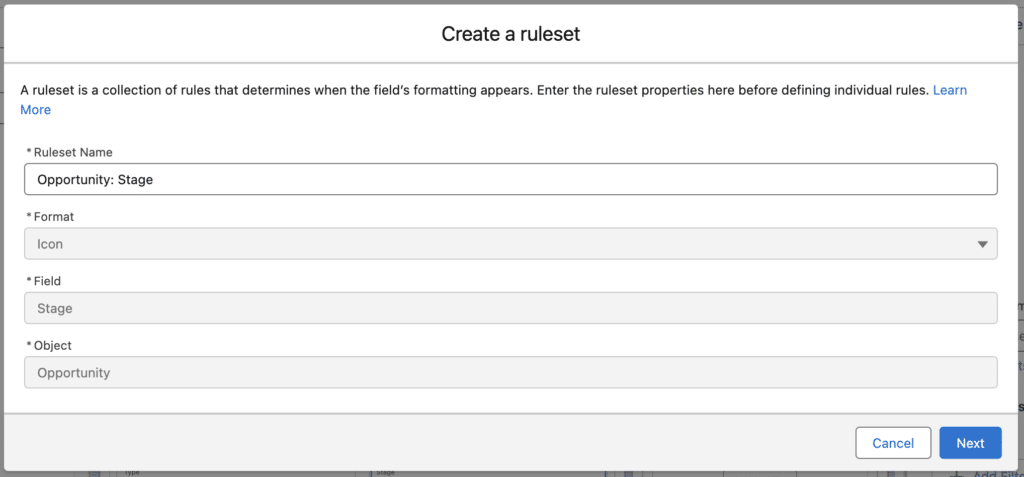
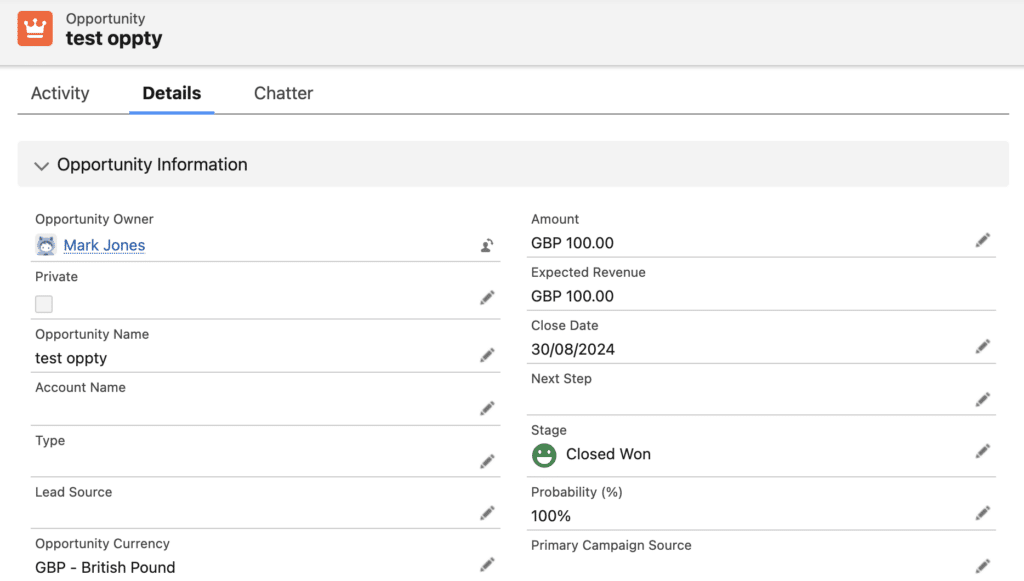
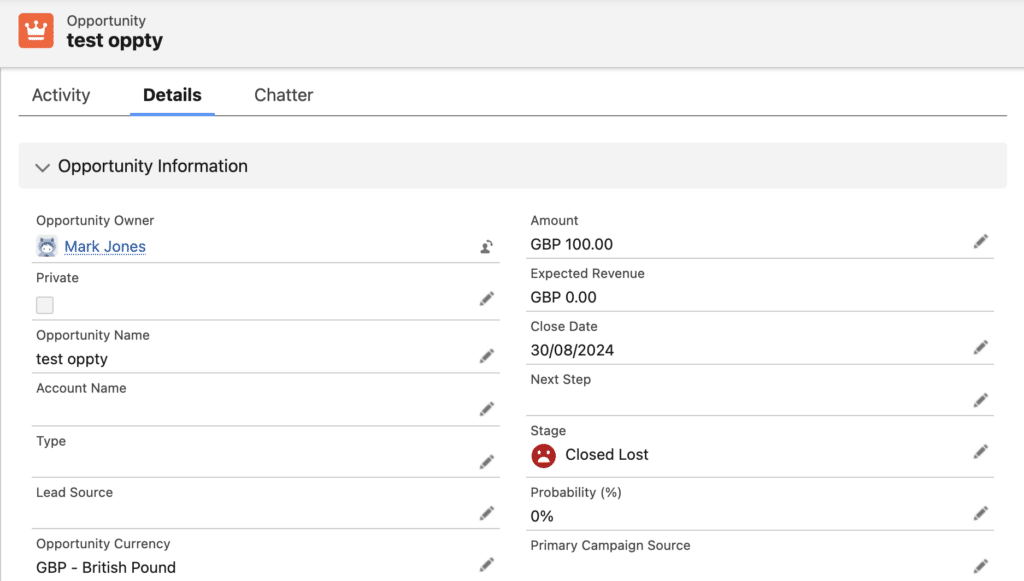
Highlight Specific Fields Using Conditional Formatting
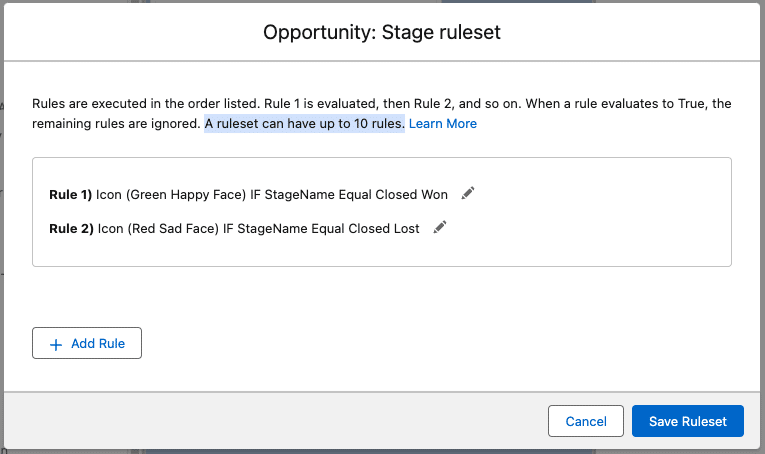
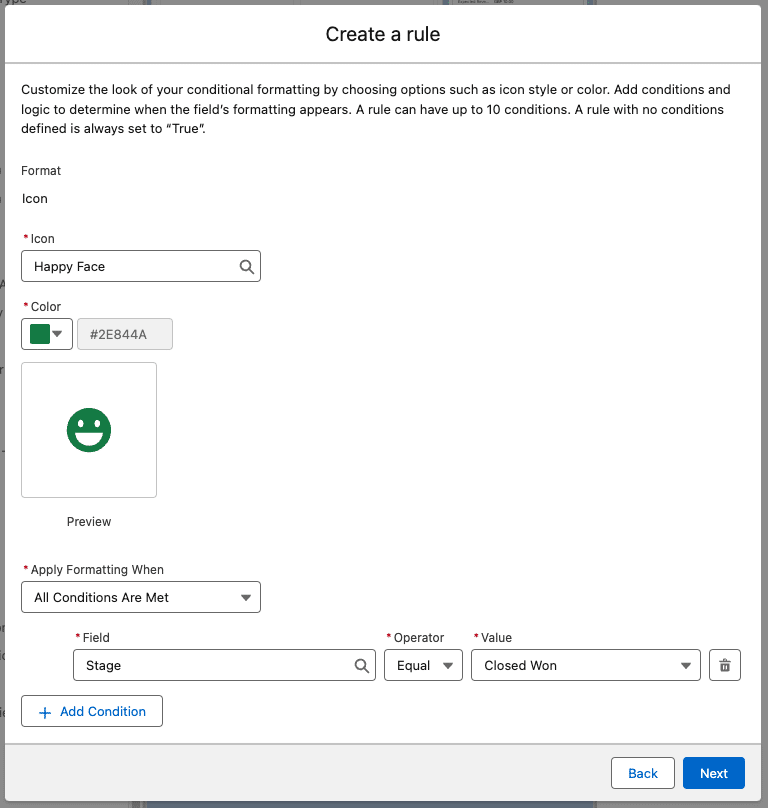
The next highlight within the area of customisation to focus on is the ability to highlight key information using Conditional Formatting. Conditional Formatting in Lightning App Builder allows you to create a combination of rulesets and rules for fields. Conditional Formatting Rules allow you to set up criteria for displaying a coloured icon next to the field selected in the ruleset. You can apply multiple rules to a single ruleset to make fields stand out even more. Conditional Formatting Rules apply a hierarchal structure to how they are applied, as follows:
- Rule 1 will be evaluated and applied if the conditions for the rule are true.
- If the conditions for rule 1 don’t apply, then rule 2 will be evaluated, and so on until all rules are evaluated, with the relevant rule being applied if the conditions are true.
- When a rule is found to be true, the evaluation process is stopped and any other rules for that ruleset are ignored.
To see conditional formatting in action, please check out the screenshots shown below.
There is a lot to talk about around Conditional Formatting, so we will look to put together a separate post on this topic overall. For now, it is worth noting some things to look out for.
The things to look out for with regards to Conditional Formatting are as follows:
- You need to be using Dynamic Forms in order to use Conditional Formatting.
- A Conditional Formatting Ruleset can have a maximum of 10 associated rules.
- There are a set number of icons that can be used (24 to be exact).
- There is a set list of colours that can be used (6 to be exact).
- Some fields are not accessible for conditional formatting.
- Cross-Object Fields do not have Conditional Formatting applied.
- Conditional Formatting can be applied in a Dynamic Highlights Panel, but not a standard Compact Layout.
- Conditional Formatting does not display in Edit mode.
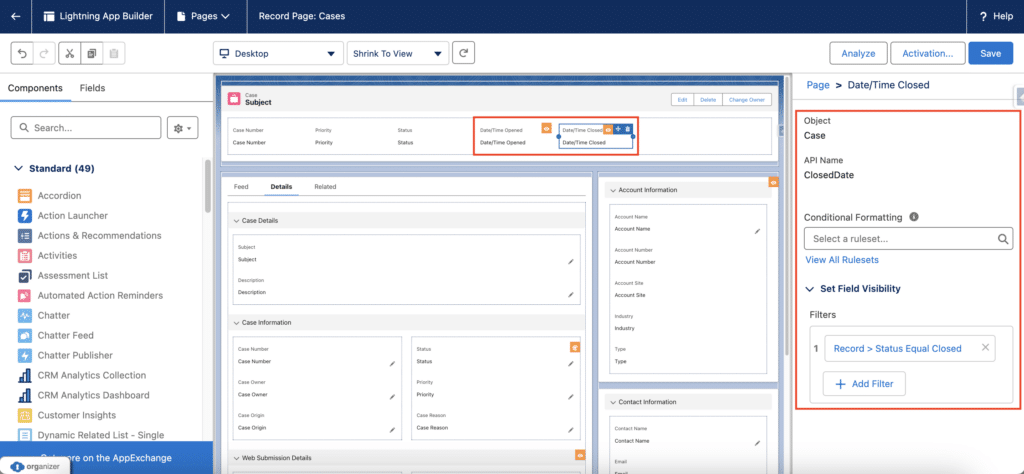
Configure a Dynamic Highlights Panel
The final update to highlight in the Winter ’25 updates around customisation is the update to Salesforce’s dynamic page functionality. This update sees the launch of the ability to create a Dynamic Highlights Panel. The Highlights Panel in Salesforce is the name given to the selection of fields that you see highlighted at the top of the page for a record. Historically, you have had to create different Highlight Panels on a record type by record type basis. Now, in Winter ’25 you can create a single Highlights Panel and to choose which fields appear in it and when they should be shown. The Dynamic Highlights Panel can include up to 12 fields which is slightly more than the standard one, this functionality is also enhanced by the ability to use Custom Visibility Rules to determine when fields in the panel should be shown in the panel.
Identity and Access Management Updates
Alongside the customisation items we have highlighted, there are some items around Identity and Access Management that we feel you should be aware of. To simplify this section, we are going to provide a list of items for your consideration, each item will be linked to the relevant release note which you can read online.
The list of items we feel you should read through are as follows:
- The Multi-Factor Authentication Assistant in Setup Is No Longer Needed and Discontinued
- Forgot Password Invalid Username Error Message Was Changed
- Salesforce Authenticator Users Are Automatically Guided to a Workaround if Push Notifications Time Out
- Identify the Salesforce Authenticator App More Easily
Email Related Updates
There are some email related updates that we feel you should look at. As above, we are simply going to provide links to the items we feel you should read up on in the list shown below:
Flow Enhancements
Finally, in this release there are a number of Flow enhancements.
The standout updates from this release for Flow in our mind are:
- Troubleshoot Configuration Issues Systematically with the Errors and Warning Pane
- Identify Inefficient Flow Designs with New Tips
- Provide a Better Screen Flow Experience with Action Buttons (Generally Available)
- Collect User Input to Modify a List of Records from a Screen
- Select Multiple Choices with Choice Lookup Component
- Recognise and Differentiate Between Custom Components Instantly in Screen Elements
- Create or Update Records Efficiently with the Create Records Element
- Expand Your Email Reach by Using CC and BCC Options in Send Email Action
If you would like to see more detailed information on some of the updates to Flow, our Salesforce Consultant, Mark Jones is working on a series of posts, which you can access here.
Closing Comments
So that’s our top (Admin focused) updates we think you should know about for the recent Winter ’25 seasonal release from Salesforce. As stated at the beginning, this is not an exhaustive list of updates, below we have shared some additional resources for you to check out and get more information on the features and updates coming in this release.